Saturday 31 October 2015

Difference between logical and bitwise operators in Java(&&,|| and &,|)

       The logical(non-bitwise) operators && and || are short-circuit operators. In other words, with && if the LHS(Left Hand Side) is false, the RHS(Right Hand Side) will never be evaluated. With || if the LHS is true, then the RHS will never be evaluated.  On the other hand, the bitwise operators & and | are non short-circuit, will always evaluate both the LHS and RHS.
     This is especially useful in guarding against nullness.

      String x = null;

            if ( x != null && x.equals("xyz") {

                   then do something with x...

            }
                
      The above condition is the best example for handle the null exception. If u put first condition is not equal to null then only it will check for other conditions.
 

      String x = null;

            if ( x != null & x.equals("xyz") {

                   then do something with x...

            }

      In the above example (bitwise & operator) ,it will check the all conditions in the if statements, so it will throw the NullPointerException.
       One main difference between & and && is, bitwise &  you can use with both integral and boolean but && you can use with only boolean operands.

Some Programs based on logical & bitwise operators:--

1) What is the output of given code?

 class OperatorExOne {
      public static void main (String[] args) {
             String a = null;
             if(a != null && a.equals("Java")) {
                   System.out.println("Inside If Statement");
             } else {
                    System.out.println("Inside else Statement");
             }
      }
 }

 Output:- Inside else Statement
       
       In the above code it will print else part i.e "Inside else Statement". In if statement there are two conditions with && operator. In logical AND operator it will check the first condition if it is false then it won't check the 2nd condition and it will return false. In the above code first condition is false so it won't check the 2nd condition. In second condition it is exception but it won't check the condition at all.
      In the above code,if we changed the first condition of if statement, then it will throw NullPointerException, See below.

2) What is the output of given code?


 class OperatorExTwo {
                     
       public static void main (String[] args) {
              
              String a = null;
                            
              if(a.equals("a") && a != null ) {
                     System.out.println ("Inside If Statement");
              } else {
                     System.out.println ("Inside else Statement");
              }
       }
 }  


Output:-java.lang.NullPointerException


         Above code will throw  NullPointerException because the first condition of if statement is true and it will check the second condition, and will throw NullPointerException.


3) What is the output of given code?


 class OperatorExThree {
       
       public static void main (String[] args) {
             
             int a = 2;
             int b = 3;
             int result = a & b;
             System.out.println(result);
      }
 }

Output:- 2


4) What is the output of given code?

 class OperatorExFour {
       
       public static void main (String[] args) {
             
             int a = 2;
             int b = 3;
             int result = a && b;       //Compilation error
             System.out.println(result);
      }
 }

 Output:-  Compilation error,

The operator && is undefined for the argument
                 type(s) int, int


Related Posts:--
1) String Interview Questions and Answers
2) Exception Handling Interview questions and answers
3) Interface and Abstract Class Interview Questions and Answers

Saturday 24 October 2015

Difference between Loose Coupling and Tight Coupling in Java With Examples.

       First to understand what is Loose coupling and Tight coupling and also to know the  advantage of loose coupling.
    
        In short Loose coupling means reducing dependencies of a class that use different class directly . Tight coupling means classes and objects are dependent on one another. In general tight coupling is usually not good because it reduces flexibility and re-usability of code and it makes changes much more difficult and not easy to test.

Tight Coupling:-


      Tightly coupled object is an object that needs to know quite a bit about other objects and are usually highly dependent on each other's interfaces. Changing one object in a tightly coupled application often requires changes to a number of other objects. In a small application we can easily identify the changes and there is less chance to miss anything. But in large applications these inter-dependencies are not always known by every programmer and there is chance of overlooking changes.(Source- from StackOverflow).
         See below code is for tight coupling.

   public class Journey {
         Car car = new Car();
         public void startJourney() {
               car.travel();
         }
   }

   public class Car {
         public void travel () {
              System.out.println("Travel by Car");
         }
   }
 
         In the above code the Journey class is dependents on Car class to provide service to the end user(main class to call this Journey class).
         In the above case Journey class is tightly coupled with Car class it means if any change in the Car class requires Journey class to change. For example if Car class travel() method change to journey() method then you have to change the startJourney() method will call journey() method instead of calling travel() method.
        
      See below code,


  public class Journey {
        Car car = new Car();
        public void startJourney() {
               car.journey();
        }
  }

  public class Car {
        public void journey () {
              System.out.println("Travel by Car");
        }
  } 

         The best example of tight coupling is RMI(Remote Method Invocation)(Now a days  every where using web services and SOAP instead of using RMI, it has some disadvantages).

 Loose Coupling:-


        Loose coupling is a design goal that seeks to reduce the inter-dependencies between components of a system with the goal of reducing the risk that changes in one component will require changes in any other component. Loose coupling is much more generic concept intended to increase the flexibility of system, make it more maintainable and makes the entire framework more stable.
     
Below code is an example of loose coupling,


   public interface Vehicle {
        void start();
   }
         
   public class Car implements Vehicle {
        @Override
        public void start() {
              System.out.println("Travel by Car");
        }
   }

   public class Bike implements Vehicle {
         @Override 
         public void start() {
               System.out.println("Travel by Bike");
         }
   }
             
    // create main class Journey
   public class Journey {
         public static void main(String[] args) {
               Vehicle v = new Car();
               v.start();
         }
   } 

        In the above example, Journey and Car objects are loosely coupled. It means Vehicle is an interface and we can inject any of the implemented classes at run time and we can provide service to the end user.

        The examples of Loose coupling are Interface, JMS, Spring IOC(Dependency Injection, it can reduce the tight coupling).

Advantages Of Loose coupling:-


         A loosely coupled will help you when your application need to change or grow. If you design with loosely coupled architecture, only a few parts of the application should be affected when requirements change. With too a tight coupled architecture, many parts will need to change and it will be difficult to identify exactly which parts will be affected. In short,

 1) It improves the testability.                                                      
 2) It helps you follow the GOF principle of program to interfaces, not implementations.
 3) The benefit is that it's much easier to swap other pieces of code/modules/objects/components when the pieces are not dependent on one another.
 4) It's highly changeable. One module doesn't break other modules in unpredictable ways.


Related Post:- 
1) Spring Annotations
2) Spring MVC with Hibernate CRUD Example
3) Spring MVC workflow with example
4) Factory Design Pattern in Java
5) String Interview Questions and Answers
6) What is IOC Container in Spring? Difference between BeanFactory and ApplicationContext
7) Java Date and Calendar Examples
8) Exception Handling Interview questions and answers
9) Java Program to Count Occurrence of Word in a Sentence

Tuesday 6 October 2015

What is PermGen in Java? How to solve the Java.Lang.OutOfMemoryError: PermGen Space

          The java.lang.OutOfMemoryError in Java is a subclass of java.lang.VirtualMachineError and JVM throws java.lang.OutOfMemoryError when it ran out of memory in heap. When you will try to create an object and there is not enough space in heap to allocate that object then you will get OutOfMemoryError.

         Types of OutOfMemoryError in Java

1) Java.lang.OutOfMemoryError: Java heap space

2) Java.lang.OutOfMemoryError: PermGen space

Now we will discuss about PernGen space,

PermGen stands for Permanent Generation.

       Java applications are only allowed to use a limited amount of memory. The exact amount of memory your particular application can use is specified during application startup. To make things more complex, Java memory is separated into Young, Tenured and PermGen regions.
 
      The size of all these is set during the JVM launch. If you didn't set the sizes of these regions then platform specific default will be used(The default PermGen Space allocated is 64 MB for server mode and 32 MB for client mode).


Causes:

       The mainly the permanent generation consists of class declarations loaded and stored into PermGen. This includes the name and fields of the class, methods with the method bytecode, constant pool information, object arrays and type arrays associated with a class and Just In Time compiler optimizations.

        From the above paragraph, we can say that the main cause for  the java.lang.OutOfMemoryError: PermGen space is that either too many classes or too big classes are loaded to the permanent generation.


Solution:--

          As explained in above, this OutOfMemory error in java comes when Permanent generation of heap filled up.
         To fix this OutOfMemoryError in Java you need to increase heap size of  Perm space by using JVM option   "-XX:MaxPermSize".
         You can also specify initial size of Perm space by using    "-XX:PermSize" and keeping both initial and maximum Perm Space you can prevent some full garbage collection which may occur when Perm Space gets re-sized. Here is how you can specify initial and maximum Perm size in Java:

export JVM_ARGS="-XX:PermSize=64M -XX:MaxPermSize=256m"

Note:-
      In Java 8, PermGen area has been replaced by MetaSpace area, which is more efficient and is unlimited by default (or more precisely - limited by amount of native memory, depending on 32 or 64 bit jvm and OS virtual memory availability) .


Related Post :--
How to generate the StackOverflowError and OutOfMemoryError programmatically in Java  

Sunday 23 August 2015

How to solve "Source not found" error during debug in Eclipse.


     In this post, we will learn how to solve "Source not found" error while doing the debug in Eclipse.

     If you run your web application using Java EE Server and try to run it in the debug mode,once you hit the breakpoint , you will get this error ,"Source not found". See the below screenshot.

Source not found error in eclipse
Source not found error screen

   To solve the above problem, please follow the below steps,

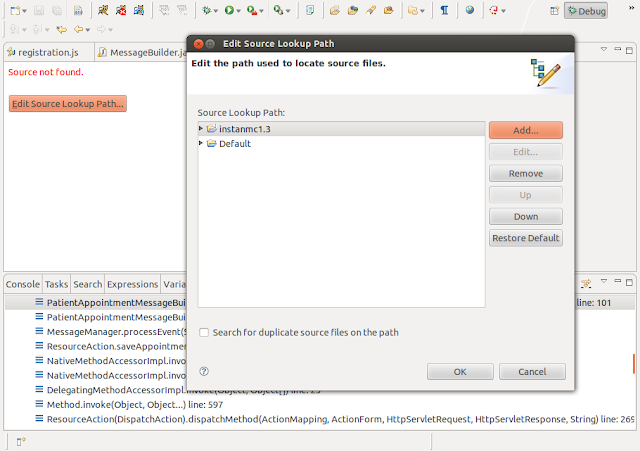
1) Click on "Edit Source Lookup Path". You will get the below  "Edit Source Lookup Path"  pop-up(New Window).

Edit source Lookup Path
Edit Source Lookup Path

2) Click on "Add" button of  Edit Source Lookup Window.

Add Java Project
Add Java Project

3) Select "Java Project" and Click on "Ok" button. You will get new Window Project Selection.


Project Selection
Project Selection

4) Select the appropriate Project. & Click on "OK".


Select appropriate Project
Project selected


  5) Click on OK for the selected project. Then you are able to do the Debug.


Ok for Selected Project
Debug working fine

Monday 20 July 2015

Factory Design Pattern in Java


           Factory pattern is one of most used design pattern in Java. This type of design pattern comes under Creational Design Pattern as this pattern provides one of the best ways to create an object.

          In Factory pattern, we create object without exposing the creation logic to the client and refer to newly created object using a common interface. & this pattern provides loose coupling.
          
          In this post, we will look at complete example of the Factory Design Pattern implemented in Java. In the below example, w'll learn how to use the Factory pattern in different message types(There are three message types in the example, SMS, Email and Notification). This is one simple example.
    
          First we can create one abstract class or an interface. MessageBuilder is an abstract class having one abstract method build.
     
    public abstract class MessageBuilder {
             public abstract void build () ;
    }


          In the above  class build is not fully implemented so next we can create particular message type builder so that can extends the Messagebuilder and you can implement the build method according to that message type. In the below codes, there are three mesage type builder ,SMSMessageBuilder, EMAILMessageBuilder and NotificationMessageBuilder. and each can extends MessageBuilder abstract class and to implements the build methods. Each MessageBuilder of build method is implemented differently according to their requirement.
 
   
    class SMSMessageBuilder extends MessageBuilder {   
            public void build () {   
                      System.out.println("This is SMS message Type");   
                      // do processing SMS message type
            }
    }

    class EMAILMessageBuilder extends MessageBuilder {   
             public void build() {   
                       System.out.println("This is Email Message Type");    
                       //do proceessing EMAIL things.
             }
    }

   class NotificationMessageBuilder extends MessageBuilder {   
            public void build () {   
                   System.out.println("This is Notification Message Type");    
                   // do processing Notification things.
           }
   }

      Next step is to define the Factory class, in this case which is a MessageBuilderFactory. As you can see in the below code, the static getBuilder method will return particular "MessageBuilder" object based on the parameter messageType.

   
 class MessageBuilderFactory {
       
      public static MessageBuilder getBuilder(String messageType) {   
              if (messageType.equals("SMS")) {           
                       return new SMSMessageBuilder();           
              } else if (messageType.equals("EMAIL")) {           
                       return new EMAILMessageBuilder();       
              } else if (messageType.equals("NOTIFICATION")) {           
                       return new NotificationMessageBuilder();       
              } else {
                       return new SMSMessageBuilder();         //default MessageBuilder.

              }
       }
 }

    Next step is to create the main class to test the above the Factory class to passing the messageType.
you can pass any type of messageType and check it. 
    
 class MessageManager {
       public static void main(String[] args) {       
              String messageType = "SMS";       
              MessageBuilder builder = MessageBuilderFactory.getBuilder(messageType);
              builder.build();   
      }
 }

 Output:-
                      This is SMS message Type.

           If you want to add new message type in the above existing code then you have to create one  Implemented MessageBuilder class that can extends abstract MessageBuilder class. In the MessageBuilderFactory you can add one else if condition and to pass messageType as parameter.

 Factory Pattern Examples in JDK:

1) valueOf() method which returns the object created by factory equivalent to parameter passed.
2) java.util.Calendar, ResourceBundle and NumberFormat of getInstance() method uses Factory Pattern.
  
 Advantages of Factory Design Pattern:

1) code is flexible, loosely coupled and reusable by moving the object creation from the client  code
    to the Factory class and it's subclasses. It is easier to maintain such code since the object creation        is centralized.
2) The client code deals with only the product interface  or abstract and hence any concrete        
     products can be added without modifying client code logic.
3) It encourages a consistency in the code as object is created through a Factory which forces a 
    definite set of rules which everybody must follow(other developer can easily understand the code). 
    This avoids using different constructor at different client.


Related Post:-- 
1) Singleton Design Pattern in Java With Example
2) What is IOC Container in Spring? Difference between BeanFactory and ApplicationContext
3) String Interview Questions and Answers
4) What are different Spring Bean Scopes?
5) Spring MVC with Hibernate CRUD Example
6) What are different states of an entity bean in Hibernate?

Saturday 25 April 2015

What is Serialization in Java? Where we use Serialization?

       Java Serialization allows us to convert an Object to byte stream that we can send over the network or save it as file or store in DB for later usage.
       Deserialization is the process of converting Object stream to actual Java Object  to be used in our program.

Serialization In Java
       Image: Serialization & Deserialization Process

      If you want a class object to be serializable, all you need to do it implement the java.io.Serializable interface.  Serializable is a marker interface and has no fields or methods to implement.
      Serialization process is implemented by ObjectInputStream and ObjectOutputStream, so all we need is a wrapper over them to either save it to file or send it over the network. Let’s see a simple Serialization example.

java.io.Serializable Interface:

    package com.adnblog;
    import java.io.Serializable;

    public class Student implements Serializable {

            private static final long serialVersionUID = 6470090944414208496L;
            private String name;
            private int id;
            transient private String address;
          
            @Override
            public String toString(){
                     return     "Student{name="+name+",id="+id+",address="+address+"}";
            }

            //getter and setter methods
            public String getName() {
                     return name;
            }
            public void setName(String name) {
                    this.name = name;
            }

            public int getId() {
                    return id;
            }
            public void setId(int id) {
                    this.id = id;
            }

            public String getAddress() {
                   return address;
            }
            public void setAddress(String address) {
                    this.address = address;
            }
     } 

  Notice that for a class to be serialized successfully, two conditions must be met:
1)The class must implement the java.io.Serializable interface.
2)All of the fields in the class must be serializable. If a field is not serializable, it must be marked as transient. In the above Student class address is non-serializable field.

       Now, once a class is serializable, we can write the object to any OutputStream, such as to disk or a socket connection. To achieve this, we must first create an instance of java.io.ObjectOutputStream, and pass the constructor an existing OutputStream instance.
 
     package com.adnblog;

     import java.io.FileOutputStream;
     import java.io.ObjectOutputStream;

     public class SerializeObject {
           public static void main(String[] args) {
                  String filename = "Serialize.ser";    //give the file name with file name
                  Student st = new Student();
                  st.setName("Anil");
                  st.setId(24);
                  st.setAddress("A/P-Sonyal,Tal-Jath,Dist-Sangli");

                  // save the object to file
                  FileOutputStream fos = null;
                  ObjectOutputStream out = null;
                  try {
                       fos = new FileOutputStream(filename);
                       out = new ObjectOutputStream(fos);
                       out.writeObject(st);
                  } catch (Exception ex) {
                      ex.printStackTrace();
                  } finally {
                       if(out != null) {
                             out.close();
                       }
                  }
            }
     }

Deserialization:--

       Deserialization is the process of converting Object stream to actual Java Object  to be used in our program. Below is code for deserialization of java objects, here we just need to get an FileInputStream object from the file that contains object's bytes and pass this to ObjectInputStream's object's constructor. Method readObject() returns an object whose bytes are being read from the file.

          package com.adnblog;

          import java.io.FileInputStream;
          import java.io.ObjectInputStream;

          public class DeserializeObject {
                   public static void main(String[] args) {
                            String filename = "Serialize.ser";   
                            Student st = null;
                               // read the object from file
                            FileInputStream fis = null;
                            ObjectInputStream ois = null;
                            try {
                                   fis = new FileInputStream(filename);
                                   ois = new ObjectInputStream(fis);
                                   st = (Student) ois.readObject();
                            } catch (Exception ex) {
                                          ex.printStackTrace();
                            }
                            finally {
                                       if(ois != null) {
                                             ois.close();

                                      }

                            }
                            System.out.println(st);
                   }
           }

Uses Of  Serialization:-
    1. Banking example: When the account holder tries to withdraw money from the server through ATM, the account holder information along with the withdrawl details will be serialized (marshalled/flattened to bytes) and sent to server where the details are deserialized (unmarshalled/rebuilt the bytes)and used to perform operations. This will reduce the network calls as we are serializing the whole object and sending to server and further request for information from client is not needed by the server.

    2. Stock example: Lets say an user wants the stock updates immediately when he request for it. To achieve this, everytime we have an update, we can serialize it and save it in a file. When user requests the information, deserialize it from file and provide the information. This way we dont need to make the user wait for the information until we hit the database, perform computations and get the result.

Here are some uses of serialization

1. Convert java object into byte stream and then it can be saved in database for persistence.
2. If two JVM want to communicate, then object serialization is one of the approaches.
3. Send the java object in network as byte stream by serialization and at the other end deserialize to get  same object in same state.
4. Cache the object by serialization instead of keeping it in memory.

Serialization and Deserialization Related Questions:

1) What is a serialVersionUID and why should  use it?

          The serialization runtime associates with each serializable class a version number, called a serialVersionUID, which is used during deserialization to verify that the sender and receiver of a serialized object have loaded  classes for that object that are compatible with respect to serialization. If the receiver has loaded a class for the object that has a different serialVersionUID than that of the corresponding sender's class, then deserialization will result in an InvalidClassException. A serializable class can declare its own serialVersionUID explicitly by declaring a field named "serialVersionUID" that must be static, final, and of type long.

 ANY-ACCESS-MODIFIER static final long serialVersionUID = 42L;

2) Do we need to implement any method of Serializable interface to make an object serializable?
 No. Serializable is a Marker Interface. It does not have any methods.

3) How to make the field as Non Serializable?
         Sometimes you don't want to serialize/store all the fields in the object. Say some fields you want to hide to preserve the privacy or some fields you may want to read only from master data, then you don't serialize them. To do this, you just need to declare a field as transient field.

        transient private String address;

       Also the static fields are not serialized. Actually there is no point in serializing static fields as static fields do not represent object state but represent class state and it can be modified by any other object. Lets assume that you have serialized a static field and its value and before deserialization of the object, the static field value is changed by some other object. Now the static field value that is serialized/stored is no more valid. Hence it make no point in serializing the static field.

Note :-- The static and transient fields can not be serialized.

Thursday 12 March 2015

How to create File and Directory in Java & File Related Interview Questions

           A file or a directory in the file system is represented by two abstract concept in java. These abstract concepts are java.io.File and java.nio.file.Path. The File class represents a file in the file system whereas the interface Path represents the path string of the file.
           In this tutorial we look at various operations on File or Path.

Instantiating a java.io.File:

     Before you can do anything with the file system or File class, you must obtain a File instance.

  There are following constructors to create a File object:

1)Following syntax creates a new File instance from a parent abstract pathname and a child pathname string.

        File(File parent, String child)

2)Following syntax creates a new File instance by converting the given  pathname string into an abstract pathname.

       File(String pathname)

3)Following syntax creates a new File instance from a parent pathname string and a child pathname string. 

       File(String parent, String child) 

4)Following syntax creates a new File instance by converting the given file: URI into an abstract pathname.

        File(URI uri)

     Once you have File object in hand then there is a list of helper methods which can be used manipulate the files.

Important Methods of File class:
1) boolean exists();
2) boolean createNewFile();
3) boolean mkdir();
4) boolean mkdirs();
5) boolan isFile();
6) boolean isDirectory();
7) String[] list();
8) long length();
9) boolean delete();
10) public boolean exists();

Check if File Exists:--
        Once you have instantiated a File object you can check if the corresponding file actually exists already. The File class constructor will not fail if the file does not already exists. You might want to create it now.

To check if the file exists, call the exists() method. Here is a simple example:
     package com.adnblog;
     import java.io.File;
     public class fileExistance {
            public static void main(String[] args) {
                    File file = new File("D:/ImpFiles/file.txt");
                    if(file.exists()) {
                            System.out.println("File existed");
                     }
                     else {
                            System.out.println("File doesn't exists");
                     }
            }
      }
It will print "File Existed" if file is existed in the given directory or it will print else part but it won't throw any error if file doesn't exists. 


Create a New Directory:- 

       You can use the File class to create directories if they don't already exists. The File class contains the method mkdir() and mkdirs() for that purpose.

       The mkdir() method creates a single directory if it does not already exist & mkdirs() method creates multiple directories if it doesn't exist.

 Here is an example:

        package com.adnblog;
        import java.io.File;
        public class CreateDirectoryEx {
                public static void main(String[] args) {   
                        File file = new File("C:\\Directory1");
                        if (!file.exists()) {
                                  if (file.mkdir()) {
                                           System.out.println("Directory is created!");
                                  } else {
                                           System.out.println("Failed to create directory!");
                                   }
                         }

                              //multiple directory example
                         File files = new File("C:\\Directory2\\Sub1\\Sub");
                         if (files.exists()) {
                                   if (files.mkdirs()) {
                                          System.out.println("Multiple directories are created!");
                                   } else {
                                    System.out.println("Failed to create multiple directories!");
                                   }
                          }

                 }
         } 
 
Create New File:

          You can use the File class to create new Files if they don't already exists. The File class contains the method createNewFile() to create the new file. First to check the file is existed or not, if not then create new file.

        package com.adnblog;
        import java.io.File;
        public class fileExistance {
               public static void main(String[] args) {
                       File file = new File("D:/ImpFiles/file.txt");
                       if(!file.exists()) {
                               if(file.createNewFile()) {
                                        System.out.println("New File created!");
                               }
                               else {
                                        System.out.println("Failed to create New File");
                               }
                       }
               }
        }


File Length:-

      To read the length of a file in bytes, call the length() method. Here is a simple example:

               File file = new File("
D:/ImpFiles/file.txt");
               long length = file.length();


Rename or Move File :--

          To rename (or move) a file, call the method renameTo() on the File class. Here is a simple example:

                File file = new File("
D:/ImpFiles/file.txt");
                boolean success = file.renameTo(new File("
D:/ImpFiles/Newfile.txt"));

          As briefly mentioned earlier, the renameTo() method can also be used to move a file to a different directory. The new file name passed to the renameTo() method does not have to be in the same directory as the file was already residing in.

         The renameTo() method returns boolean (true or false), indicating whether the renaming was successful. Renaming of moving a file may fail for various reasons, like the file being open, wrong file permissions etc.


Delete File:--

 To delete a file call the delete() method. Here is a simple example:

                 File file = new File("
D:/ImpFiles/file.txt");
                 boolean success = file.delete();

        The delete() method returns boolean (true or false), indicating whether the deletion was successful. Deleting a file may fail for various reasons, like the file being open, wrong file permissions etc. 


Check if Path is File or Directory:--

       A File object can point to both a file or a directory.
    

       You can check if a File object points to a file or directory, by calling its isDirectory() method. This method returns true if the File points to a directory, and false if the File points to a file. Here is a simple example:
                package com.adnblog;
                import java.io.File;
                public class fileExistance {
                      public static void main(String[] args) {
                             File file = new File("D:/ImpFiles/file.txt");
                             if(file.
isDirectory()) {
                                    System.out.println("This is Directory!");
                             }
                             else {
                                    System.out.println("This is a File!");
                             }
                      }
                }


Read List of Files in Directory:--

      You can obtain a list of all the files in a directory by calling either the list() method or the listFiles() method.
      The list() method returns an array of String's with the file and / or directory names of directory the File object points to. 

     The listFiles() returns an array of File objects representing the files and / or directories in the 
directory the File points to.

Here is a simple example:
              package com.adnblog;

              import java.io.File;
              public class Practice {
                     public static void main(String[] args) {
                            File file = new File("/home/insta/anil/Desktop");
                            File[] filesList = file.listFiles();
                            for(File f : filesList){
                                    System.out.println(f);
                            }
                    }
              }

In the above program it will print the each file in whole path see output
         /home/insta/anil/Desktop/Resume.doc
        /home/insta/anil/Desktop/SalarySlip.pdf
        /home/insta/anil/Desktop/ImpNotes.csv

or
             package com.adnblog;
             import java.io.File;

             public class Practice {
                   public static void main(String[] args) {
                          File file = new File("/home/insta/anil/Desktop");
                          String[] filesList = file.list()
                          for(String f : filesList){
                                   System.out.println(f);
                          }
                   }

             }

In the above program it will print the each file name itself not an path.
       Resume.doc
       SalarySlip.pdf
       ImpNotes.csv