Friday, 28 December 2018

Spring Boot Starters

          In previous post, we discussed how to create the Spring boot application using Spring Intializr. In the current post, we will learn the need of spring boot starters and what are the spring boot starters.

     Starters are a set of convenient dependency descriptors that you can include in your application. You get a one-stop-shop for all the Spring and related technology that you need, without having to hunt through sample code and copy paste loads of dependency descriptors. (Reference :-Spring Doc)

    Spring Boot Starters are just JAR Files. They are used by Spring Boot Framework to provide Automatic Dependency Resolution . It means it will add the convenient dependencies for the application. All starters in spring boot start with spring-boot-starter- .  You can also create your own starter but it shouldn't start with spring-boot-starter-, give some other convenient name(Create Own Starter).

    For example, if you want to get started using Spring and JPA for database access, include the spring-boot-starter-data-jpa dependency in your project. Automatically it will add all the required dependencies for jpa to access the database. 


List of Spring boot starters


1)  spring-boot-starter


This starter contains core starter, including auto-configuration support, logging and YAML.

Add this starter into pom.xml, check the below pom.xml.

<dependencies>
     <dependency>  
         <groupId>org.springframework.boot</groupId>
         <artifactId>spring-boot-starter</artifactId>
    </dependency>
</dependencies>


2) spring-boot-starter-web

    Starter for building web, including RESTful, applications using Spring MVC. Uses Tomcat as the default embedded container.

pom.xml,(to add this starter)

<dependencies>
     <dependency>  
         <groupId>org.springframework.boot</groupId>
         <artifactId>spring-boot-starter-web</artifactId>
    </dependency>
</dependencies>


3) spring-boot-starter-data-jpa

This starter is used to access database for Spring and JPA.

pom.xml,

<dependencies>
     <dependency>  
         <groupId>org.springframework.boot</groupId>
         <artifactId>spring-boot-starter-data-jpa</artifactId>
    </dependency>
</dependencies>


4) spring-boot-starter-jdbc

This Starter for using JDBC with the HikariCP connection pool.

pom.xml,

<dependencies>
     <dependency>  
         <groupId>org.springframework.boot</groupId>
         <artifactId>spring-boot-starter-jdbc</artifactId>
    </dependency>
</dependencies>


5) spring-boot-starter-data-ldap

This Starter for using Spring Data LDAP.

pom.xml,

<dependencies>
     <dependency>  
         <groupId>org.springframework.boot</groupId>
         <artifactId>spring-boot-starter-data-ldap</artifactId>
    </dependency>
</dependencies>


6) spring-boot-starter-data-mongodb

This Starter for using MongoDB(NoSQL database) and Spring Data MongoDB.

pom.xml,

<dependencies>
     <dependency>  
         <groupId>org.springframework.boot</groupId>
         <artifactId>spring-boot-starter-data-mongodb</artifactId>
    </dependency>
</dependencies>


7) spring-boot-starter-security

This starter is using for spring security, to achieve authentication and authorization.

pom.xml,

<dependencies>
     <dependency>  
         <groupId>org.springframework.boot</groupId>
         <artifactId>spring-boot-starter-security</artifactId>
    </dependency>
</dependencies>


8) spring-boot-starter-cache

This starter for using Spring Framework’s caching support.

pom.xml,

<dependencies>
     <dependency>  
         <groupId>org.springframework.boot</groupId>
         <artifactId>spring-boot-starter-cache</artifactId>
    </dependency>
</dependencies>


9) spring-boot-starter-json

This starter is for reading and writing json data.

pom.xml,

<dependencies>
     <dependency>  
         <groupId>org.springframework.boot</groupId>
         <artifactId>spring-boot-starter-json</artifactId>
    </dependency>
</dependencies>


10) spring-boot-starter-test

Starter for testing Spring Boot applications with libraries including JUnit and Mockito.

pom.xml,

<dependencies>
     <dependency>  
         <groupId>org.springframework.boot</groupId>
         <artifactId>spring-boot-starter-test</artifactId>
    </dependency>
</dependencies>


11) spring-boot-starter-validation

Starter for using Java Bean Validation with Hibernate Validator.

pom.xml,

<dependencies>
     <dependency>  
         <groupId>org.springframework.boot</groupId>
         <artifactId>spring-boot-starter-validation</artifactId>
    </dependency>
</dependencies>

       There are so many other starters also available in spring boot, i have not mentioned here.  Only some of important starters listed above. For other starters you can refer Spring documentation.


Note:- As a developer, I would not need to worry about either these dependencies or their compatible versions.


Related Post:--
1) The @SpringBootApplication Annotation usage and example
2) Advantages of Spring Boot
3) How to create the Spring Boot Project using Spring Initializr tool ?
4) Causes and Solution of NoSuchBeanDefinitionException in Spring.

Monday, 24 December 2018

Database Schema of Hygieia

           As we know that Hygieia uses MongoDB as database to store and retrieve the data. MongoDB is a document-oriented DBMS. It stores the data in terms of collections instead of tables, it's equivalent to tables in RDBMS.

         In this post, we will discuss what are the collections used in the Hygieia and sample screenshots of MongoDB collections.

       The following table gives a list of collections in Hygieia and the corresponding collectors that populate data for each collection,

database schema of hygieia

Some of the sample collections(MongoDB collections) as follows,


pipelines collection:-


pipeline collection in hygieia

Commits collection:-


commits collection in hygieia


builds collection:-


builds collection in hygieia


collector_items collection:--


collector_items collection in hygieia


Thank you for visiting blog.
Have a great day.


Related Posts:--
1) Hygieia Introduction
2) Hygieia Developer Setup
3) Hygieia End User Configuration
4) Hygieia Architecture
5) Collectors in Hygieia
6) DevOps Dashboards

Friday, 14 December 2018

How to create the Spring Boot Project using Spring Initializr tool ?

        In the previous post, we discussed the usage and example of @SpingBootApplication annotation. Current post, will discuss about to create the Spring boot application using Spring Initializr.

        One of the difficult things to start with a framework is initial setup, particularly if you are starting from scratch and you don't have a reference setup or project, Spring Initialzr solve this problem.
 
      Spring Initiliazr is a web tool provided by Spring to create the Spring boot application. It is helpful for the beginner, it will create the initial set up or project structure. 

Spring Initialzr URL : Spring Initilazr


Select Maven project and dependencies. Fill other details like Group, Artifact and click on generate project.

I have selected Web, JPA, DevTools and Actuator as dependencies.
Spring Initializr

When click on "Generate Project" , it will ask for download project, will download the zip file.

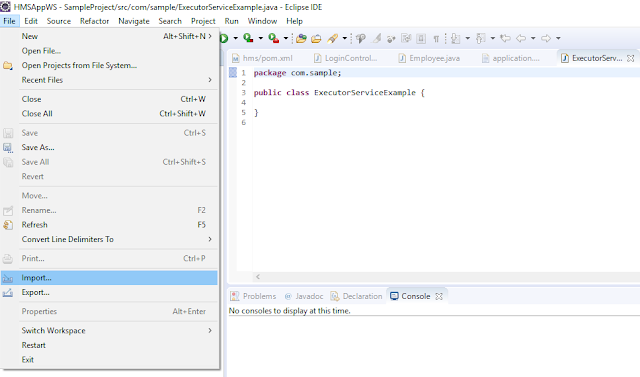
Extract the downloaded project file, and import into eclipse tool.
Import project in eclipse


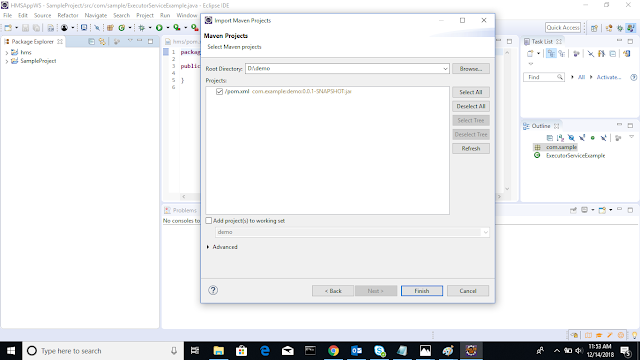
Select Existing Maven Project, browse the extracted project directory.


Next,

Browse project directory

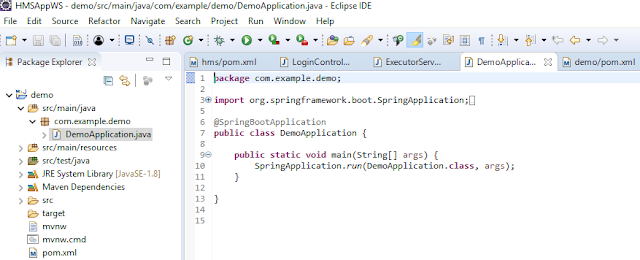
Now the Demo project is imported into eclipse,

The project structure it looks like below,


The main class DemoApplication.java,


Spring boot Application class

The pom.xml,

<?xml version="1.0" encoding="UTF-8"?>
<project xmlns="http://maven.apache.org/POM/4.0.0" xmlns:xsi="http://www.w3.org/2001/XMLSchema-instance"
 xsi:schemaLocation="http://maven.apache.org/POM/4.0.0 http://maven.apache.org/xsd/maven-4.0.0.xsd">
 <modelVersion>4.0.0</modelVersion>
 <parent>
     <groupId>org.springframework.boot</groupId>
     <artifactId>spring-boot-starter-parent</artifactId>
      <version>2.1.1.RELEASE</version>
      <relativePath/> <!-- lookup parent from repository -->
 </parent>
    <groupId>com.example</groupId>
    <artifactId>demo</artifactId>
    <version>0.0.1-SNAPSHOT</version>
    <name>demo</name>
    <description>Demo project for Spring Boot</description>

 <properties>
       <java.version>1.8</java.version>
 </properties>

 <dependencies>
      <dependency>
           <groupId>org.springframework.boot</groupId>
           <artifactId>spring-boot-starter-actuator</artifactId>
      </dependency>
      <dependency>
          <groupId>org.springframework.boot</groupId>
          <artifactId>spring-boot-starter-data-jpa</artifactId>
      </dependency>
      <dependency>
          <groupId>org.springframework.boot</groupId>
          <artifactId>spring-boot-starter-web</artifactId>
      </dependency>

      <dependency>
          <groupId>org.springframework.boot</groupId>
          <artifactId>spring-boot-devtools</artifactId>
          <scope>runtime</scope>
      </dependency>
      <dependency>
          <groupId>org.springframework.boot</groupId>
          <artifactId>spring-boot-starter-test</artifactId>
          <scope>test</scope>
      </dependency>
 </dependencies>

 <build>
    <plugins>
       <plugin>
           <groupId>org.springframework.boot</groupId>
           <artifactId>spring-boot-maven-plugin</artifactId>
       </plugin>
    </plugins>
 </build>

</project>

Thank you for visiting blog...


Related Posts:--
1) The @SpringBootApplication Annotation usage and example
2) Explain advantages of Spring Boot
3) Causes and Solution of NoSuchBeanDefinitionException in Spring.
4) Cause and solution of LazyInitializationException in Hibernate

Thursday, 13 December 2018

The @SpringBootApplication Annotation usage and example

         In the current post, we will learn the @SpringBootApplication annotation usage and example. As we know that, we are using @ComponentScan, @Configuration and @EnableAutoConfiguration annotations for main class of spring class to enable the spring features.

         In spring boot, We will use the @SpringBootApplication annotation in our Application or Main class to enable a host of features, e.g. Java-based Spring configuration(@Configuration), component scanning(@ComponentScan), and in particular for enabling Spring Boot's auto-configuration feature.

     In Spring applications, we can use the following annotations as mentioned earlier,


  • @Configuration to enable Java-based configuration
  • @ComponentScan to enable component scanning.
  • @EnableAutoConfiguration to enable Spring Boot's auto-configuration feature.


        In short, I will explain the usage of @SpringBootApplication annotation,

The @SpringBootApplication annotation is a combination of following three Spring annotations and provides the functionality of all three with just one line of code.

@SpringBootApplication = @Configuration + @ComponentScan + @EnableAutoConfiguration


Sample Spring boot main class example,


package com.example.springbootapp;

import org.springframework.boot.SpringApplication;
import org.springframework.boot.autoconfigure.SpringBootApplication;

@SpringBootApplication    // same as @Configuration @EnableAutoConfiguration @ComponentScan
public class Application {

          public static void main(String[] args) {
                   SpringApplication.run(Application.class, args);
          }

}


       In Spring Application, we can use @ComponentScan("com.example") annotation to scan the component as mentioned in argument i.e com.example. 

       In Spring boot, you can override, with the @SpringBootApplication, the default values of component scan. You just need to include it as a parameters,

@SpringBootApplication(scanBasePackages = "com.example")

or String array(comma separated)

@SpringBootApplication(scanBasePackages = {"com.example", "com.main"})


Example:-


package com.example.springbootapp;

import org.springframework.boot.SpringApplication;
import org.springframework.boot.autoconfigure.SpringBootApplication;

@SpringBootApplication(scanBasePackages = "com.example")
public class Application {

          public static void main(String[] args) {
                     SpringApplication.run(Application.class, args);
          }

}

In the upcoming posts, we will learn few more Spring boot annotations and examples.

Thank you for visiting blog.
Have a great day.


Related Posts:--
1) Explain advantages of Spring Boot
2) Causes and Solution of NoSuchBeanDefinitionException in Spring
3) Cause and solution of LazyInitializationException in Hibernate

Friday, 30 November 2018

Collectors in Hygieia

          In previous post, we learned how to do end user set up in Hygieia with screenshots. In the current post, we can discuss what is collector in Hygieia and what are the collectors available in Hygieia.

  • What is Collector in Hygieia ?

The collector in Hygieia fetches the data from the DevOps tools and saves into MongoDB database. Hygieia uses MongoDB as the database for storage and retrieval of data.


Collector Work Flow in hygieia


For each collector, data saves different mongodb collection, e.g bitbucket data will save into commits collection, bamboo build data will save into builds collection and udeploy environment data will save into environment_component collection.

  • How to run Collector in Hygieia ?

Generally, you can run the collectors using the following command,


java -jar <Path to collector-name.jar> --spring.config.name=<prefix for properties> --spring.config.location=<path to properties file location>


      You may choose the collectors applicable to your DevOps toolset from the list of supported collectors. In addition, you may write your own collector and plug it in to match your DevOps toolset.


  • Supported Collectors

Hygieia supports the following collectors:

  1. Build Collectors - Jenkins, Bamboo, Jenkins-codequality, Jenkins Cucumber & Sonar
  2. Cloud Collectors - AWS.
  3. Deploy Collectors - uDeploy, XLDeploy
  4. Feature Collectors - Jira, VersionOne, Gitlab & Rally.
  5. Miscellaneous Collectors - Chat Ops & Score.
  6. SCM Collectors - Bitbucket, GitHub, Gitlab, Subversion & GitHub GraphQL.
  7. Performance Collector - AppDynamics.
  8. Configuration Management Database (CMDB) - HP Service Manager (HPSM).
  9. Library Policy - Nexus IQ.
  10. Artifact Repository - Artifactory.

  • Creation of Encrypted Key for private Repo's

       Encryption for private repositories requires that you generate a secret key and add it to your repository settings files. The steps for encrypting private repositories are as follows,

Step 1: From the core module, generate a secret key.

 java -jar <path-to-jar>/core-2.0.5-SNAPSHOT.jar com.capitalone.dashboard.util.Encryption


Step 2: Add the generated key to the API properties file.

 api.properties

 key=<your-generated-key>


Step 3: Add that same generated key to your repository settings file. This key is required for the target collector to decrypt your saved repository password.

For example, if your repo is GitHub, add the following to the github.properties file:

 github.properties,

 github.key=<your-generated-key>


Related Posts:--

Thursday, 29 November 2018

Hygieia End User Configuration

           In previous post, we learned how to set up Hygieia and given some sample properties files. In the current post, we can configure the Hygieia as shown in the below steps.


1) Create User

         There are two users to access the Hygieia dashboards.
  • Admin 
  • Other Users
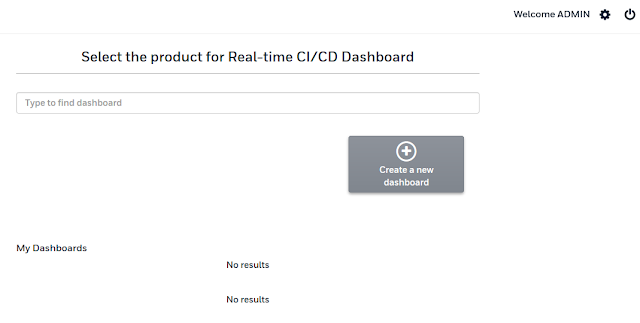
When you start UI using gulp serve , will see below home page of Hygieia.

hygieia login page

        The admin can do the following things,

  • Select a theme for the dashboard
  • Manage user and admin accounts for the dashboard
  • Set up API tokens for authentication
  • Create and manage custom dashboard templates

Create Admin:--

To create an account for an admin user:
  • Click Signup on the login page.
  • Enter admin as the username, specify and confirm the password, and then click Signup.
Username should be admin.
Hygieia signup page

Create other users also same as admin, don't give admin as username.


2) Create Team Dashboard

To create a new team dashboard:-
       In the Team Dashboards tab, click Create a new dashboard. This invokes the Create a New Dashboard screen.
Hygieia home page

Create New Dashboard screen,


Create new team dashboard in hygieia

Next, Widget Management,
select the required widget to show in the team dashboard.

Widget management in hygieia

The team dashboard contains the following views,

  • Widget View
  • Pipeline View
Team Dashboard Configuration in hygieia


I have configured build, deploy, repo widgets and pipeline view.
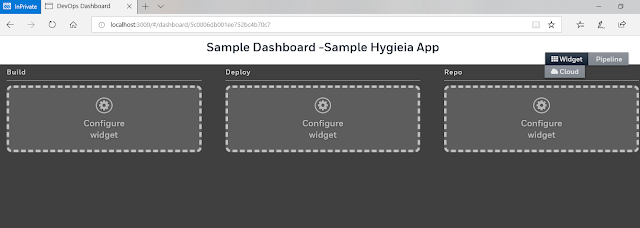
After all above configuration, the team dashboard of hygieia looks like below diagram,


Sample Team Dashboard of Hygieia


3) Create Product Dashboard

Before creating a product dashboard, ensure that the following prerequisites are met,


  • A Team Dashboard is created
  • Build and Code Repo widgets are configured on the team dashboard


        The process to create a Team Dashboard and configure the widgets is explained in the above step 2.

Create New Product Dashboard:--

Click on Create New Dashboard in home page of hygieia, add required information as shown in the below screen shot.


Creation Of Product dashboard in hygieia


After that it will create the product dashboard, without any information.

Hygieia product dashboard

Add Team Dashboard in the product dashboard, click on "Add Team"


Finally the Product Dashboard got created with commit, build and deploy commit information(stad. deviation, average time, total commit flags, and latest build) as shown below screenshot.


product dashboard of hygieia

Thanks for visiting blog.


Related Posts:-
1) Hygieia Developer Setup
2) Hygieia Architecture
3) Hygieia Introduction
4) Collectors in Hygieia

Wednesday, 28 November 2018

Hygieia Developer Setup

         As we know that Hygieia is open source DevOps tool and source code is available in the Capital One GitHub.
Set up Hygieia in Local:-

1) Install Prerequisites
The following are the prerequisites to set up Hygieia,
  • Java (Java 1.8 is recommended)
  • Maven
  • Git
  • MongoDB

2) Download or Clone Hygieia
    You can download or clone Hygieia from the GitHub Repository in your local.

3)  Build Hygieia

Run maven build from Hygieia root directory, use any one of the below mvn commands.


mvn clean install package
 
(or)
 
mvn clean install package -Dmaven.test.skip=true
 
(or for Skipping PDM Violations)
 
mvn clean install package -Dmaven.test.skip=true -Dpmd.failOnViolation=false


If everything is build fine, will display the below screen shot,

Hygieia mvn build screen


as a result of this commands, will generate the .jar file of all components. The .jar file is located in the \target folder for each component of Hygieia, including collectors.


4) Start MongoDB database  and create user in the database.

If you don't have mongo db database, download and install from mongo db website.

Create database dashboard using command - create database dashboard.

Create user admin in the database dashboard using below query,

db.createUser(
              {
                user: "admin",
                pwd: "admin",
                roles: [
                     {role: "readWrite", db: "dashboard"}
                     ]
              })


5) Run api and required collectors

We need to provide the properties file in run time while running the api and collectors. Properties file contains database name, database password, db host, port and some other required information.

Use below command to run the api,

java -jar api.jar --spring.config.location=C:\[path to]\Hygieia\api\dashboard.properties

Sample api dashboard.properties file,

dbname=dashboard
dbhost=localhost
dbport=27017
dbusername=admin
dbpassword=admin
server.port=8080
server.contextPath=/api
key=key for private repo access

Samething run required collector jars, like repo collector(bitbucket as example), build collector(Bamboo as example) and deploy collector (Udeploy as example).

Ex:-- bamboo collector

java -jar bamboo-build-collector-2.0.5-SNAPSHOT.jar --spring.config.location=<path of hygieia>\collectors\build\bamboo\bamboo.properties

Contents of sample bamboo.properties file,

dbname=dashboard
dbusername=admin
dbpassword=admin
dbhost=localhost
dbport=27017
dbreplicaset=false
dbhostport=localhost:27017
bamboo.cron=0 0/5 * * * *
bamboo.servers[0]=https://bamboo.domain.com/
bamboo.username=username of bamboo server
bamboo.apiKey[0]=apiKey of bamboo


6) Run UI using gulp serve command.

Run UI using gulp serve, in UI root directory.

Automatically it will open the browser with URL http://localhost:3000/


This is all about Hygieia local set up. Thanks for visiting blog.


Related Posts:--
1)  Hygieia Introduction
2)  Hygieia Architecture
3) Hygieia End User Configuration
4) Collectors in Hygieia